Feeds:
Posts
Comments

Archive for the ‘Mothering’ Category

Healthy snack for toddlers (and mom and dad too): chocolate almond no-bake snack bites

It was hot and humid today, around 38 degrees with the humidex. Like a greenhouse. Hot, sticky, uncomfortable.

Bee had played outside in the morning. It was after nap. I didn’t feel like going outside, and didn’t want Bee running around our sunny backyard in the heat. I had to find an indoor activity before letting her loose for some more fresh air.

Meanwhile I’m on a mission to stock up on healthy snacks. We’ve been in a snack rut, relying on what I considered “less bad” packaged goods from the store shelves. They did the trick — and I still have them as back-up — but I knew I could do much better and provide Bee with healthy, wholesome, homemade snacks.

The no-bake energy bites recipe I came across earlier this week (thanks to a Facebook post by Raspberry Kids) was the perfect activity.

I switched up the ingredients to come up with my own version for Bee. She loves them! I think both David and I will be snacking on them too — they seriously satisfy any sweet tooth. They are super easy to make too. Next time I’ll double the recipe!

Toddler making no-bake snack bites

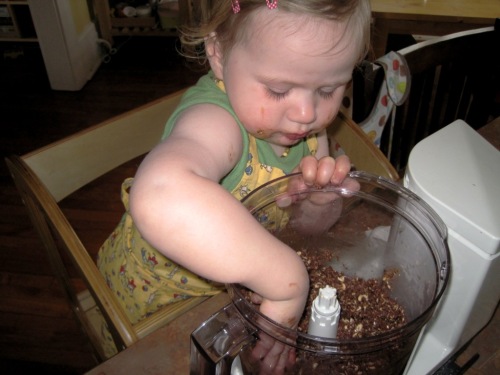
After pouring the ingredients in the bowl and pushing the button to pulse, Bee tests the resulting mixture… many times!

Recipe: Chocolate Almond No-Bake Snack Bites

Makes 25-30 snack bites (approx. 1-inch balls).

1 cup old-fashioned rolled oats
2/3 cup finely shredded unsweetened coconut, toasted (I toast mine approx. 12 minutes at 325° F, stirring every 4 minutes)
1/4 cup ground almonds
1/4 cup ground flaxseed
1/3 cup cacao (I use a raw cacao)
1/2 cup finely chopped dried pear or apricot
1/2 cup almond butter
1/4 cup honey
1 tsp vanilla

Combine all ingredients in a bowl. Mix until well combined. Form 1-inch balls. [If the mixture seems sticky and difficult to shape into balls, then refrigerate for 30 minutes before making the balls.] Refrigerate or freeze.

[I used a food processor, because I wanted the oatmeal to be a bit finer. The method is the same: combine all ingredients in the bowl. Pulse to combine, scraping down the sides if necessary to make sure all ingredients are well mixed.]

Read Full Post »

HomemadeSpeltWaffle

My breakfast this morning. Just what I needed to turn my day around!

Some days get off to a rocky start. Usually earlier than anticipated, on a day when I already feel more tired than usual.

Immediately there’s a conflict of needs: bright-eyed (or crying) Bee needs/wants me for something, and I just want/need to sleep a little longer. Then a bunch of other things annoy me too — all those little things that add extra motions to my morning on a day when I’m moving in slow motion.

Yes, I know, it’s all a state of mind. I choose whether to smile or to frown. And only I can change my approach to the day and the way I interact with the people around me.

If I haven’t been able to make the shift by breakfast time, then the first meal of the day needs to be a waffle. Having a homemade waffle for breakfast is my reset button. Even when I’m already in a brighter mood by the time I get to the kitchen, a waffle will give me the final boost.

We make waffles on weekends, a double recipe, and freeze the extras. It’s easy to reheat a waffle in the toaster oven. I like to eat mine topped with maple syrup, blueberries (and other berries if I happen to have some on hand) and plain yoghurt.

Now that’s a good start to the day!

Recipe: Crispy Spelt Waffles with Oatmeal and Flax Seed

Makes 6-8 waffles.

2 cups spelt flour (if you don’t have spelt flour, use some other kind of flour!)
1/2 cup old-fashioned rolled oats
1/4 cup ground flax seed
1 tbsp sugar
1 tbsp baking powder
2 eggs
1 3/4 cups milk

Preheat waffle iron as per instructions.

Combine all dry ingredients in a bowl. Beat together eggs and milk in a second bowl. Pour wet ingredients into dry and combine until just mixed.

Prepare waffles as per your waffle iron’s instructions.

Read Full Post »

Gardening toddlerIn April, I wrote about how Bee and I were spending afternoons cooking together. Then the weather changed.

It got warm and I wanted to go outside in the afternoon and not be stuck in the kitchen. I started preparing as much of dinner as possible during nap time in order to be able to take Bee outside after her nap. Turns out she’s quite the Nature Girl and loves being outside!

We spend lots of time in the backyard, where she likes to explore, dig in the dirt, collect worms, observe bugs with great curiosity, run, climb,… I take advantage of the time and her growing independence to garden, having her help me if she’s interested.

The first time she saw me planting seeds, she wanted to plant some too, of course. I set her up with a pot of earth and some older seeds. She redefined square-foot gardening that day!

Gardening toddler

Bee planting whatever seeds she could get her hands on. Now that’s square foot gardening!

Gardening toddler

Making sure it looks nice… or just having fun sticking popsicle sticks in the soil.

Gardening toddler

Watering to help the seeds grow.

Square foot gardening by a toddler

About three weeks later: peas, radishes, flowers, arugula, and probably other sprouts too!

Meanwhile I had some reinforcements (my parents) help David and me set up some additional vegetable growing beds. That meant moving all of our perennials to the front, which has gone from looking rather dismal to quite delightful — we just increased our curb appeal! I think it will look lovely next spring when all the bulbs bloom.

Last weekend David planted our tomato seedlings. The new setup with grow light worked wonders. The seedlings look strong and grew straight.

Tomato seedlings, week 2

The tomato seedlings under the grow light after two weeks. When David planted them they were taller, but just as straight and strong.

Meanwhile I sowed carrot, chard, beet, spinach, radicchio, kale, cabbage and salsify seeds in our new plots. I also put a second batch of seeds under our grow lights. Those eggplants, cucumbers and zucchini seedlings should be ready to plant in two-three weeks — along with various beans and edamame — when the soil is nice and warm.

I’m already harvesting radishes and baby greens. This weekend I’ll put in some more radish, arugula and mesclun mix seeds to make sure we have an ongoing supply of greens and garnishes for salad.

First harvest of baby greens: mesclun salad mix and kaleI’m excited for this year’s gardening season: more space, new opportunities, getting my hands dirty, lots of fun!

Read Full Post »

Breastfeeding toddler

My view several times per day. (Not easy to snap a picture of an easily distracted and very-interested-in-the-camera toddler while breastfeeding!)

Before having Bee, I wasn’t committed to breastfeeding. I’d heard stories of problems and pain. I thought “If it works, then good. If it doesn’t, oh well.”

Yet here I am with a 19-month old nursling, who shows no signs of giving up the boob. Nor do I have a need to stop nursing her for the time being. In fact, I’m happy to continue breastfeeding her for the health benefits to both her and myself until there is a compelling reason or circumstance for me to stop.

I feel lucky that I never had any breastfeeding problems, though the path was a bit rocky sometimes.

Like most new mothers who are feeding on demand, it started with having to get used to being in constant demand, coupled with uncertainty. The nagging question of “Am I doing it right?” despite the fact that Bee was gaining weight regularly. Then it was getting over my hang up of breastfeeding in public. Since I overcame that discomfort, it’s been smooth sailing.

I also feel lucky to live in a neighbourhood, and be part of a community, that is open and supportive of breastfeeding.  All of my closest momfriends are still breastfeeding their toddlers.

One of my momfriends decided that this extended breastfeeding was worthy of celebration. Last Sunday I was invited to a “boob celebration” along with another still-nursing mother. Of course, husbands (whose breastfeeding support is invaluable) and toddlers (the raison d’être of our breastfeeding) were invited too!

I’d heard of lactation cookies, but had never made any. This event became the perfect opportunity to bake some to share with these lactating ladies. The recipe is a mash-up of the ones I found on Peaceful Parenting and The Progressive Parent. Both sites do a good job of explaining what the key ingredients oats, flax and Brewer’s yeast do to boost milk production — not that we really need the extra help at this point. Aside from the main benefit, I really just wanted them to taste good.

I’m happy with the results, and think they are nourishing cookies for anyone. David and Bee certainly approve, and so do the lactating ladies!

Lactation cookie made with oats, flax and Brewer's yeast to boost milk production, and other ingredients to make them taste good!

Recipe: Lactation Cookies

This recipe makes approx. 5 dozen cookies. These cookies are not overly sweet; they taste “nutritious”. The chocolate chips and dried apricots add sweetness, but if you prefer sweeter cookies, increase the brown sugar to 1 cup.

1 1/2 cups whole wheat flour
3 tbsp Brewer’s yeast
1 tsp baking powder
1 tsp salt
1 tsp each cinnamon, ground ginger
3/4 cup ground/milled flax seed
1/2 cup water
3/4 cup butter, softened
1/2 cup almond butter
3/4 cup brown sugar, packed
2 eggs
1 tbsp molasses
1 tsp vanilla
2 cups old-fashioned rolled oats (not quick cook)
1 cup dark chocolate chips
1 cup chopped almonds (or cashews or macadamia nuts)
3/4 cup chopped dried apricots (or raisins, if you prefer)

Preheat oven to 375° F. Line or grease baking sheets.

In a medium bowl, combine flour, Brewer’s yeast, baking powder, salt and spices.

In a second (small) bowl, combine ground/milled flax seed and water. Mix with a spoon to make a thick paste. As the mixture sits, it will thicken into one lump.

In a third (large) bowl, beat butter until light and fluffy. Add almond butter and beat until combined. Beat in sugar, then eggs one at a time. Mix in flax seed mixture, molasses and vanilla.

Mix in flour mixture, then oats and finally the chocolate chips, chopped almonds and chopped dried apricots.

Make small balls of dough and place on cookie sheet. Press down balls with a spoon or fork. Bake for 8-10 minutes or until golden brown.

Read Full Post »

Toddler peeling onions.

Bee focusing on peeling onions. She managed to remove the outer skins.

I always knew I would enjoy motherhood. I felt it would give me the opportunity to do more of some of the things I love, cooking and baking in particular. While it’s taken 18+ months to get to this point — I didn’t necessarily expect to get there sooner — I’m totally loving it: cooking a fresh, interesting and tasty dinner on most nights; trying out new recipes; transforming ideas onto the plate; eating good food! I’m in a real sweet spot, and Bee is playing along.

A good part of our afternoons are spent cooking, and some mornings we bake together. She may spend some time with me at the counter, helping me or playing with food scraps or, her favourite, water. Or she may cook in her own mini kitchen, where I see her imitate what she sees me doing. Or she may simply occupy herself otherwise, checking in with me every so often. The process takes longer, with frequent pauses for various reasons, but the food gets on the table.

Although I sometimes feel guilty that I’m not spending the time playing with Bee, I figure she is seeing a good example of home cooking and learning some valuable skills. Over time, I should be able to involve her more and more.

Toddler making muffins.

Bee stirring (and tasting, of course) the wet ingredients for muffins.

Just the other day we tried a new muffin recipe together. It’s been a long time since I got excited about a muffin recipe (probably not since I came up with the date and cranberry muffins with oatmeal streusel topping), but these banana carrot muffins are stellar!

I’m always searching for recipes with low/no sugar or tweaking them to reduce the amount of sugar. Too often recipes have too much sugar, which is not only bad for us but also, in my opinion, masks the other flavours. This recipe gets just the right amount of sweetness from bananas, dates and a touch of maple syrup, and includes a lot of healthy ingredients. I can’t get enough of them, and Bee is a fan too. Another sweet spot!

Banana carrot muffins.

Recipe: Banana Carrot Muffins

This recipe is adapted from Dr. Weil’s Carrot-Banana Muffin recipe. I made a combination of mini and regular size muffins; the recipe made 24 mini muffins and 9 regular-size muffins. 

Dry:
2/3 cup whole wheat flour
2/3 cup old fashioned oats
2/3 cup ground almonds/almond meal
1/4 cup ground flax seed
1/2 cup unsweetened shredded coconut
1 tsp each cinnamon, cardamom, ginger
1 tbsp baking powder
1/2 tsp salt
1 cup chopped pitted dates
3/4 cup chopped walnuts

Wet:
3 eggs
3 ripe bananas, mashed
1/4 cup vegetable oil
1 1/2 tbsp maple syrup
2 tsp lemon juice
1 tsp vanilla
2 medium carrots, finely grated

Preheat oven to 350° F. Line/grease 12 regular size muffin cups (or combination of mini and regular-size muffin cups).

In a bowl, combine all dry ingredients. Combine all wet ingredients in a second bowl. The chopped dates will tend to stick together. With your fingers separate them once they are in the flour mixture; coating each piece with the flour mixture will prevent them from sticking together.

Pour wet ingredients into dry, and blend until flour mixture is just moistened.

Fill muffin cups. Bake 30-35 minutes or until golden brown and tester comes out clean. (Mini muffins will be done sooner, in approx. 25 minutes.)

Read Full Post »

Older Posts »